 USA

Installing an HRV in an Existing Home: What to Expect
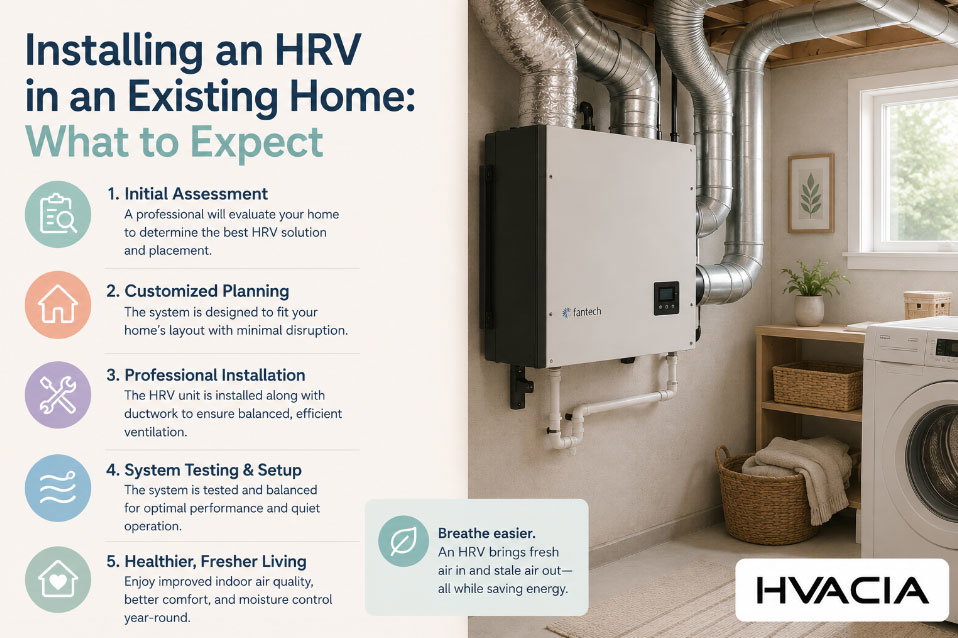
There's a specific kind of morning that sends homeowners searching for answers online. Windows fogged from the inside. A faint mustiness in the hall closet that wasn't there last winter. A kid's cough that seems to follow the thermostat schedule. None of these things scream "ventilation problem" on their own, but together, they're often the first real signal that a house has become too good at holding onto its own air.
That's usually the moment the phrase "install HRV existing home" starts showing up in search bars at 11 p.m. It's a reasonable instinct. A heat recovery ventilator, or HRV, is one of the few upgrades that can take a stale, humid, or stuffy house and give it consistent, fresh, temperature-tempered air without blowing the heating bill sky-high. But retrofitting one into a house that was never designed for it is a different animal than installing one in new construction, where the ductwork gets planned before the drywall goes up.
This piece walks through what actually happens when you install an HRV in an existing home — the assessment, the ductwork gymnastics, the timeline, the cost, and the weeks afterward when you notice your house breathing differently. Along the way, we'll drop into a few real-world-style retrofits to show how this plays out in houses of different ages and layouts.
What an HRV Actually Does to Your Air
A heat recovery ventilator is a mechanical box, usually installed in a mechanical room, basement, or attic, that continuously exchanges stale indoor air for fresh outdoor air. The trick is in the name: as the outgoing air leaves the house, it passes through a core alongside the incoming air, transferring most of its heat (or coolness, depending on the season) before it exits. In a cold climate, that means the fresh air coming in during January isn't 10°F — it's already been warmed to somewhere close to room temperature before it ever reaches a supply grille.
This matters because older homes were never built to be airtight, so they never needed mechanical ventilation. Gaps around windows, chimneys, and rim joists did the job of "ventilating" by accident, at the cost of comfort and energy efficiency. As homeowners air-seal, re-insulate, and replace old windows, that accidental ventilation disappears — and indoor air quality can quietly decline unless something is put in its place. An HRV is that something.
Why More Existing Homes Are Getting Retrofitted
Take a 1962 rancher at 142 Birchwood Lane, the kind of house with a finished basement, a single-story footprint, and a furnace that's been replaced twice since Kennedy was in office. Fifteen years ago, this house leaked air constantly. After a deep energy retrofit — new attic insulation, air sealing around the sill plate, replacement windows — the same house became noticeably tighter. The homeowners noticed condensation on the inside of the new windows every winter morning, something that had never happened with the old, drafty ones. That's not a window defect. That's a house that no longer breathes on its own.
This scenario repeats itself across the country as weatherization programs, insulation rebates, and window replacements make older housing stock significantly more airtight. The tighter the envelope, the more essential it becomes to bring in fresh air deliberately rather than by accident. Groups like the U.S. Department of Energy and ENERGY STAR have both pushed efficiency upgrades for years, and mechanical ventilation is increasingly treated as the natural next step rather than an optional extra.
The Telltale Signs Your House Is Asking for Help
Not every stuffy room needs a whole-house ventilation system, but a cluster of these symptoms is a strong signal that it's time to look seriously at an HRV retrofit:
- Condensation or frost forming on the inside of windows during colder months
- A persistent musty smell in basements, closets, or bathrooms that cleaning doesn't fix
- Noticeably stale or "heavy" air, especially in the morning before anyone opens a window
- Higher-than-expected humidity readings (consistently above 50–55% indoors in winter)
- Household members experiencing more frequent allergy or asthma flare-ups indoors than outdoors
- A recent air-sealing, insulation, or window replacement project that made the house feel "stuffier" afterward
- Visible mold growth in corners, closets, or around window frames
If two or three of these sound familiar, an HRV retrofit is worth a real conversation with a ventilation contractor rather than a bandage fix like running a bathroom fan longer.
HRV or ERV? The Decision Point Before You Drill Any Holes
Before any ductwork gets touched, there's a fork in the road: heat recovery ventilator, or its cousin, the energy recovery ventilator (ERV). Both do the core job of exchanging stale air for fresh air while recovering energy, but they handle humidity differently, and that difference matters a lot depending on climate.
An HRV transfers heat but not moisture, which tends to suit colder, drier climates where the goal is to avoid pumping additional humidity into an already humid indoor environment during winter. An ERV transfers both heat and a portion of moisture, which is often preferred in hot, humid climates or in homes that run dry in winter and want to retain a bit of that indoor humidity rather than losing it all to the outgoing air stream.
| Feature | HRV (Heat Recovery Ventilator) | ERV (Energy Recovery Ventilator) |
|---|---|---|
| What it transfers | Heat only | Heat and moisture |
| Best climate fit | Cold, dry winters | Humid summers or dry winters needing moisture retention |
| Effect on indoor humidity | Can dry out indoor air further in winter | Helps stabilize indoor humidity year-round |
| Common use case | Northern climates, tight winter envelopes | Mixed and humid climates, summer-heavy cooling loads |
| Core type | Aluminum or polymer heat-exchange core | Enthalpy core (transfers moisture via a membrane) |
| Typical maintenance | Filter changes, occasional core cleaning | Filter changes, core cleaning, membrane inspection |
| Relative cost | Slightly lower | Slightly higher due to enthalpy core |
Neither option is universally "better" — it's a climate and comfort decision, and it's one a qualified contractor should walk through using local climate data rather than a one-size-fits-all recommendation. The Home Ventilating Institute maintains a directory of certified ventilation equipment and can be a useful reference point when comparing specific models.
Anatomy of a Retrofit: Getting Ductwork Into a House That Wasn't Built for It
New construction gets to plan ventilation ductwork before the walls close up. Existing homes don't have that luxury, which is where most of the real complexity in an HRV retrofit lives. Consider a 1925 bungalow at 87 Sycamore Court — plaster walls, a shallow crawlspace instead of a full basement, and zero chase space for new ductwork. This is a common retrofit puzzle, and it's worth walking through step by step.
The Site Assessment
Every legitimate retrofit starts with a site visit, not a sales pitch. A contractor should walk the attic, basement or crawlspace, and mechanical room, checking for accessible pathways, existing chases (like old chimney flues or closet stacks that run floor to floor), and the location of the electrical panel for a new dedicated circuit. This is also when a load calculation happens — sizing the HRV to the home's square footage, occupancy, and airtightness level rather than guessing.
Choosing a Duct Path
This is the single biggest variable in any existing-home installation. In a house like the one on Sycamore Court, with no basement to run ducts through, installers often look at attic-based distribution, running insulated flex duct from the HRV unit down through interior closets or a chase built around existing plumbing stacks. In a house like the rancher on Birchwood Lane, with a full unfinished basement, the ducting is comparatively simple — most of it runs overhead in the basement ceiling before dropping up into first-floor rooms through short vertical runs.
Two-story homes without basement access, like a colonial at 2210 Maple Ridge Drive, present the hardest case: ducts may need to travel between floors, which typically means sacrificing a small amount of closet space to build a vertical chase, or opting for a partially ducted design that serves only the most critical rooms — bedrooms and living areas — rather than the whole house.
Core Drilling and Termination Hoods
Every HRV needs two penetrations to the outside: one intake for fresh air, one exhaust for stale air. These are typically 6- to 8-inch holes cut through an exterior wall or rim joist, fitted with weatherproof termination hoods. Installers plan these locations carefully — kept apart enough to prevent exhaust air from being pulled back in as intake air, and positioned away from bushes, gutters, or areas where snow drifts might block airflow in winter.
Balancing and Commissioning
Once ductwork is in and the unit is powered, the job isn't done. A proper installation includes airflow balancing — measuring and adjusting the volume of air moving through each duct run with a flow hood or manometer, so no single room is over- or under-ventilated. This step separates a professional retrofit from a rushed one, and it's worth asking a contractor directly whether balancing and commissioning are included in the quote.
Ducted, Semi-Ducted, or Point-Source: Matching the System to the House
Not every existing home needs — or can physically accommodate — a fully ducted, whole-house HRV. Depending on layout and budget, there are a few real paths forward, and they come with meaningfully different levels of disruption.
| Installation Type | Best For | Disruption Level | Typical Coverage | Rough Cost Range* |
|---|---|---|---|---|
| Fully ducted whole-house | Homes with basement or attic duct access | Moderate to high | Entire home | $3,500–$8,000 |
| Semi-ducted (key rooms only) | Homes with limited chase space | Moderate | Bedrooms + main living areas | $2,500–$5,000 |
| Point-source / single-room unit | Apartments, additions, or one problem room | Low | One room or zone | $1,200–$2,800 |
| Multiple point-source units | Homes without any viable duct path | Low per unit, adds up in total | Several individual rooms | $1,200–$2,800 per unit |
*Costs vary significantly by region, contractor, home size, and existing infrastructure. These figures are general planning ranges, not quotes — always get at least two or three local estimates before committing.
Point-source units, sometimes called single-room or through-wall HRVs, are worth a mention because they've become a practical middle ground. Rather than ductwork threading through the whole house, a compact unit is installed directly through an exterior wall, serving just that room. It's a common solution in bungalows, additions, or apartments where full ducting simply isn't physically possible.
What the Timeline Actually Looks Like
Homeowners are often surprised by how quick the actual installation is compared to the planning that precedes it. For a straightforward, fully ducted retrofit in a house with decent basement or attic access, expect roughly this rhythm:
- Day 0 (assessment): A contractor visits, evaluates duct paths, performs a load calculation, and provides a quote. This can happen weeks before the install date depending on contractor availability.
- Day 1 (rough-in): Core drilling for the exterior intake and exhaust penetrations, mounting the HRV unit, and running the bulk of the new ductwork.
- Day 2 (finish and connect): Connecting supply and exhaust grilles into rooms, wiring the dedicated electrical circuit and controls, and sealing all duct joints.
- Day 3 (balancing and commissioning): Airflow measurement and adjustment at each register, a final walkthrough with the homeowner, and a run-through of the controls and filter maintenance schedule.
More complex homes — multi-story layouts without existing chases, finished basements requiring drywall patching, or older masonry construction — can stretch this to a full week or more, mostly because of the extra carpentry involved in building duct chases rather than the mechanical work itself.
What It Costs, Realistically
Total project cost for installing an HRV in an existing home typically depends on three things: the unit itself, the complexity of the duct path, and how much finished space needs to be opened up and patched afterward. As a general planning range, homeowners commonly see:
- Equipment only: roughly $600–$2,500 depending on capacity and brand
- Labor and ductwork for a full retrofit: roughly $2,000–$5,500 on top of equipment
- Additional finish work (drywall patching, closet chase construction, exterior siding repair around penetrations): often an extra $500–$1,500 if the home has finished ceilings or walls in the duct path
Homes with unfinished basements and attics tend to land on the lower end of these ranges since there's no drywall to open and patch. Homes where ductwork has to be threaded through finished, multi-story spaces land toward the higher end. It's also worth checking with a local utility provider or program like those referenced through ENERGY STAR for possible rebates, since ventilation upgrades are increasingly bundled into broader home efficiency incentive programs.
Living With an HRV: The Weeks After Installation
The most common feedback from homeowners in the first few weeks isn't about the mechanics — it's about how the house feels. Condensation on windows that used to fog every winter morning tends to disappear within days. That "heavy," stale feeling in the air, especially noticeable first thing in the morning, is usually gone by the end of the first week. Some homeowners notice a very faint hum from supply grilles at first, which typically fades into background noise the same way a refrigerator does.
Maintenance is genuinely low, but not zero. Filters — usually a washable or replaceable pre-filter on both the intake and exhaust sides — need checking every one to three months depending on the environment, more often in homes near construction, wildfire smoke, or high pollen areas. The core itself typically needs a light cleaning once or twice a year, and the exterior intake and exhaust hoods should be checked seasonally to make sure nothing (leaves, snow, spider webs) is blocking airflow.
Choosing the Right Installer
Not every HVAC contractor has deep experience with HRV retrofits specifically — it's a more specialized skill set than furnace replacement, largely because of the ductwork planning involved in an existing structure. A few questions worth asking before hiring:
- Have you completed HRV or ERV retrofits in homes with a similar layout to mine?
- Will you perform a load calculation, or are you sizing the unit based on square footage alone?
- Is airflow balancing and commissioning included in the quote, and will I get documented results?
- What brand and model are you installing, and is it certified through the Home Ventilating Institute?
- How will duct penetrations and any drywall or siding repair be finished?
Resources like Green Building Advisor and the technical guidance published by ASHRAE can also help homeowners get familiar with the terminology and standards before those conversations happen, so the questions land with more confidence.
Frequently Asked Questions
Can any existing home have an HRV installed?
Nearly any home can accommodate some form of HRV, even if a fully ducted whole-house system isn't physically possible. Point-source and semi-ducted options exist specifically for homes with limited duct access.
Will installing an HRV increase my energy bill?
The unit itself uses a small amount of electricity to run continuously, but the energy recovered from outgoing air typically offsets a meaningful portion of the heating or cooling load that fresh, unconditioned outdoor air would otherwise create. Most homeowners see the net effect as minor compared to the comfort and air quality gained.
How long does an HRV last?
A well-maintained HRV typically lasts 15 to 20 years, similar to other core HVAC equipment, provided filters are changed regularly and the unit isn't neglected.
Do I need to run an HRV all the time?
Most HRVs are designed for continuous, low-speed operation with the ability to boost during cooking, showering, or high-occupancy periods. Running it constantly at low speed is generally the intended and most efficient use case.
Is an HRV the same as a whole-house fan or bathroom exhaust fan?
No. Bathroom fans and whole-house fans simply move air out (or in) without recovering any energy, and they don't provide the same continuous, balanced fresh-air exchange that an HRV does.
How disruptive is the installation process?
For a home with reasonable basement or attic access, disruption is typically limited to a few days of work in mechanical spaces, closets, and a handful of small exterior penetrations. Homes requiring new duct chases through finished spaces will see more localized drywall work, but the footprint is still generally smaller than a full HVAC replacement.
The Bottom Line
Installing an HRV in an existing home isn't a plug-and-play upgrade, but it's far from an impossible one either. The complexity lives almost entirely in the duct path planning — figuring out how to get fresh, tempered air to the rooms that need it in a structure that was never designed with that in mind. Done well, with a proper load calculation, a sensible duct route, and real airflow balancing at the end, the payoff is a house that finally breathes the way a tight, efficient home needs to: quietly, consistently, and without the fogged windows or stale mornings that sent homeowners searching for answers in the first place.